Use Let’s Encrypt SSL certificate on Mikrotik RouterOS

These are step by step instructions how to import and use a Let’s Encrypt SSL certificate on your Mikrotik routerboard.

There are a number of Let’s Encrypt clients out there. But my favourite so far is acme.sh by . The only requirement is a shell. Works fine running as a unprivileged user as well.

In the steps below, I’m using DNS validation, but of course you can use web based as well.

In that case forward a port to the computer running acme.sh and use –standalone and –httpport (if you use a non standard port) instead of –dns.

Installation

  1. Download and install acme.sh. Or, if you’re in ”dont-really- care-what-i-download-and-run”-mode:
    $ curl https://get.acme.sh | sh
  2. Then issue a new certificate:
    $ acme.sh --issue --dns -d router.mydomain.com
  3. Add the TXT record displayed to your DNS. Look for this:
    Domain: '_acme-challenge.router.mydomain.com' 
    TXT value: 'iamNo7r3alIaHacK3rbutItc4nBfunM3ss1nGaroUnD'
  4. After you’ve added your TXT record, issue a renewal:
    $ acme.sh --renew -d router.mydomain.com                                                                                                              [205/397] 
    [thu 12 jan. 2017 20:06:09 CET] Renew: 'router.mydomain.com' 
    [thu 12 jan. 2017 20:06:09 CET] Single domain='router.mydomain.com' 
    [thu 12 jan. 2017 20:06:09 CET] Getting domain auth token for each domain 
    [thu 12 jan. 2017 20:06:09 CET] Verifying:router.mydomain.com 
    [thu 12 jan. 2017 20:06:14 CET] Success 
    [thu 12 jan. 2017 20:06:14 CET] Verify finished, start to sign. 
    [thu 12 jan. 2017 20:06:15 CET] Cert success.
  5. Install your cert. And yes, you should specify the same file for –capath and –certpath.
    $ acme.sh --installcert -d router.mydomain.com \
              --capath /home/ogg/certs/router.mydomain.com.cer \
              --certpath /home/ogg/certs/router.mydomain.com.cer \
              --keypath /home/ogg/certs/router.mydomain.com.key
    [thu 12 jan. 2017 20:18:03 CET] Installing cert to:/home/ogg/certs/router.mydomain.com.cer
    [thu 12 jan. 2017 20:18:03 CET] Installing CA to:/home/ogg/certs/router.mydomain.com.cer
    [thu 12 jan. 2017 20:18:03 CET] Installing key to:/home/ogg/certs/router.mydomain.com.key

    You now have two files to upload to your Mikrotik device. router.mydomain.com.cer and router.mydomain.com.cer.

  6. Upload the two files to your Mikrotik. I’m assuming you have ssh enabled and can login.
    $ scp router.mydomain.com.key kutersv16-sw1:router.mydomain.com.key
    router.mydomain.com.key                              100% 1337     1.6KB/s   00:00
    $ scp router.mydomain.com.cer kutersv16-sw1:router.mydomain.com.cer
    router.mydomain.com.cer                              100% 8888     1.6KB/s   00:00
  7. SSH into your router and import the certificates
    /certificate import file-name=router.mydomain.com.cer
    /certificate import file-name=router.mydomain.com.key
    

    you can then verify they’re imported. Remember the name of your certificate (used in the last step).

    /certificate print
    Flags: K - private-key, D - dsa, L - crl, C - smart-card-key, A - authority, I - issued, R - revoked, E - expired, T - trusted
     #        NAME                       COMMON-NAME                 SUBJECT-ALT-NAME         FINGERPRINT                   
     0 K    T router.mydomain.com.cer_0  router.mydomain.com         DNS:router.mydomain.com  133713371337133713371337133...
     1   L  T router.mydomain.com.cer_1  Let's Encrypt Authority X3                           713371337133713371337133713...
  8. Final step, tell your www-ssl service to use the certificate.
    /ip service set www-ssl certificate=router.mydomain.com.cer_0

And that’s it!

acme.sh already have set up a cronjob for you doing the renewal. You can then use a shell script to automatically upload after renewal. To do so, point to that script –reload-cmd <scriptpath> for it to be run after renewal.

On the Mikrotik side, you can write a script that checks if there are any certs to import, import them. You can then run this using the Scheduler. Maybe once a day/week or so to make sure you never have outdated certificates.

Example scripts

install_cert.rsc
upload.bash

Hairpin NAT example

Here is an example config to configure a hairpin NAT on Mikrotik.

In this example I have a webserver on 192.168.88.80 and my Mikrotik router is on 192.168.88.1. After adding these rules I can access my webserver via my public IP from inside the LAN. Which is a nice feature.


/ip firewall nat
add action=masquerade chain=srcnat comment="default configuration" out-interface=ether01-WAN to-addresses=0.0.0.0
add action=masquerade chain=srcnat comment="hairpin nat" dst-address=!192.168.88.1 src-address=192.168.88.0/24
... other NAT rules
add action=dst-nat chain=dstnat comment="Forward port 80 to webserver on 192.168.88.80" dst-address=!192.168.88.1 dst-address-type=local dst-port=80 protocol=tcp \
to-addresses=192.168.88.80 to-ports=80

More information can be found here.

Postfix fix wrong sender address

So, I, ahem, ”forgot” to change sender address on one of our servers the other day which resulted in a bunch of undeliverable mails on the mailserver which got rejected because the sender domain didn’t exist anymore. This is how I fixed it.

First, I created a map file in which you map out the old wrong address and the new shiny working one as such:

vim /etc/postfix/sender_canonical
sender@oldomain.nx  sender@newexistingdomain.com

run

postmap /etc/postfix/sender_canonical

then add following line to /etc/postfix/main.cf

sender_canonical_maps = hash:/etc/postfix/sender_canonical

after that reload postfix config

service postfix reload

requeue all deferred mails (or use -i to requeue specific id)

postqueue -f

then you can flush the queue if you don’t want to wait

postfix flush

and voila! Now all old mails that were ”stuck” should be delivered successfully!

SSH connections using ProxyCommand

Scenario, you have a bunch of servers on your LAN with no access to the internet and you want to be able to connect to them via a specific server.

In this case, all your servers you wan’t to connect to resolves to *.example.tld. Hence, *.example.tld in the Host line. You can of course have a single host here. Tips, if you do set Host to *.example.tld and then proxy via for example in.example.tld, it will not work (I don’t have an explanation). I opted simply to use another domain for the ”incomming connection” server.

Anyway, add lines similar to these to your ~/.ssh/config
 

Host *.example.tld
ProxyCommand ssh proxy.someother.tld 'nc -w 120 %h %p'

and you’re set!

Now when you ssh to server1.example.tld ssh will actually connect using the command ssh proxy.someother.tld 'nc -w 120 server1.example.tld'.

Pretty neat and very, very useful!

”Wrong” vim color scheme for root

On (what I’ve noticed so far) Ubuntu based distros, one thing that bugged me was that on a fresh install when you sudo into root and edit for example a config file, all comments were in dark blue color (which on a terminal with black background is terrible) but when doing it as a normal user the color theme was more pleasing (readable).

This is how I ”fix” this.

First, add these two lines to /etc/profile (which is read by /bin/bash /bin/dash /bin/sh etc at login)

sudo echo 'export COLORFGBG="15;0"' >> /etc/profile

Then, add this line in your /etc/sudoers file to keep the setting.

Defaults        env_keep += "COLORFGBG"

Which makes sudo remember the COLORFGBG setting. You can add other stuff here as well, for instance maybe you want’t to be able to run stuff that only you have in your PATH with sudo.

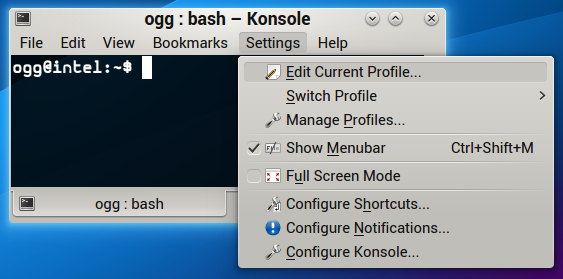
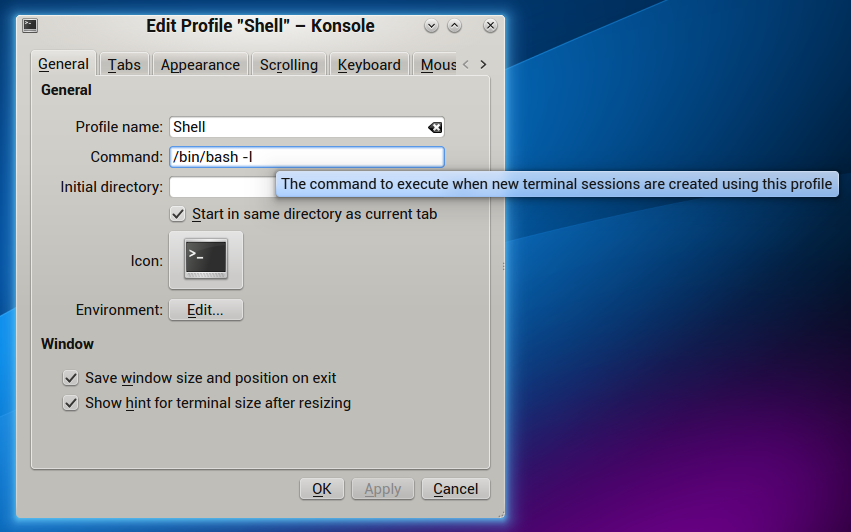
Now when you login, and sudo edit a file you get bright colors. Yay! But wait, It don’t work you say? Well, I’m guessing you run KDE or some other fancy DE and it’s terminal. Most terminals for X do run bash, but they don’t run it as a login shell, so they don’t source /etc/profile and hence the settings above won’t do any good.

My solution is to add ”-l” to the command line starting bash, which makes bash behave as it’s running as a login shell.

Here’s how to do it in Konsole in KDE:

konsole_settings konsole_shell

Fun with mod_substitute in Apache2

SearchReplaceSheetSo, a lazy sysadmin is often a good sysadmin. Right?

Background. At work we run Roundcube as a webmail frontend. And, we have ”skinned” it a tiny bit so it fits our companys look a bit more than the original layout. Basically I had created a custom logo and replaced the original roundcube_logo.png in the skins/larry directory plus some tiny css changes.

However, everytime I upgrade Roundcube, I had to manually revert these changes. Before you think I’m stupid; I do know you can create your own skins for Roundcube, but I rather not. Why? Well, because I can and because if Roundcube for instance change the default look, I don’t want to miss out.

So, what’s the solution you ask? Apache2 and mod_subsitute! Basically it’s sed in an Apache module. Actually, in the old days, it is called mod_sed ;).

What it does, is that, you guessed it, it searches and replaces in content before it gets delivered by the server. So, you can for instance search for ”roundcube_logo.png” and replace it with ”my_awesome_logo.png”. Pretty nifty. Also, for CSS changes, you can inject your own stylesheet. No modification of the original code needed, it’s magic!

Example config:

<Location />
AddOutputFilterByType SUBSTITUTE text/html
Substitute "s|</head>|<link rel=\"stylesheet\" type=\"text/css\" href=\"//static.whatever.com/roundcube.css\"></head>|ni"
Substitute "s|<img src=\"skins/larry/images/roundcube_logo.png\"|<img src=\"//static.whatever.com/my_awesome_logo.png\"|ni"
</Location>

Place this in your virtual host. I use < so it it’ll be applied to the whole site.

Then you’re free to make your changes in roundcube.css and point to your awesome logo.

So, from now on, whenever you upgrade Roundcube. You can just delete the old installation and unzip the new one and be done with it.

mailserver setup

mysza

New version based on Debian 7.2 and with the latest Modoboa… watch this space. If you wan’t to help out testing the new guide, leave a comment below.

First off, this guide like 90% complete. If you follow it, please report back if something is wrong etc.

When I first started writing, I ran through the steps a couple of times installing everything from scratch, but after a while, I got tired of re installing just to try stuff out, so some things may gone wrong along the way.

These are mostly my own notes setting up modoboa. When completed, you’ll have postfix, dovecot and modoboa running with nginx.

I won’t go into detail how to configure the various modoboa extensions, this is covered in modoboas documentation.

I’m using a minimal install of Debian Squeeze for this. So, some packages may already be installed if you don’t us the same dist. The steps described here also should work on Ubuntu, but I haven’t verified that.

Replace <fqdn> with your fully qualified domain name. For example: mail.domain.com. <domain> with your domain. For example: example.com.

This guide assumes you’ll run mailserver, mysql and modoboa on the same host. If you plan to grow, it might be a good idea to separate these.

Fortsätt läsa ”mailserver setup”

fail2ban gitlab nginx

*Edit: this doesn’t actually work. I get banned for no reason, if anyone has a better regex solution please let me know =)

If you are using gitlab and nginx, the following fail2ban rule might be useful to block failed login attempts.

First, create the file /etc/fail2ban/filter.d/nginx-gitlab.conf

# Fail2Ban configuration file
#
# Author: Olle Gustafsson
#
# $Revision: 1 $
#

[Definition]

# Option: failregex
# Notes.: regex to match the password failure messages in the logfile. The
# host must be matched by a group named "host". The tag "" can
# be used for standard IP/hostname matching and is only an alias for
# (?:::f{4,6}:)?(?P[\w\-.^_]+)
# Values: TEXT
#
failregex = ^ - -.*GET.*/1\.1.* 304 0

# Option: ignoreregex
# Notes.: regex to ignore. If this regex matches, the line is ignored.
# Values: TEXT
#
ignoreregex =

then add the following rule to /etc/fail2ban/jail.local

[nginx-gitlab]

enabled = true
port = http,https
filter = nginx-gitlab
logpath = /var/log/nginx/gitlab_access.log
maxretry = 3

restart fail2ban and voila!